
Going Up? Four Kinds of Climbing
There are lots of ways to skin a cat, and four ways to get up a climb. Here they are: use often, and in any combination you need.
1. Seated Climb
 The first type of climb is the seated climb. It’s used for fire roads or trails with mellow grades. It’s a smooth and steady climb not meant for technical features. This is because when you’re seated, it’s difficult to move your center of mass forward or back to keep even weight on your tires.
If you’re climbing and your weight is too far back, the front wheel is going to go wherever it wants – you lose directional control. The correction for that is to bring your center of mass forward so you are equally weighting the tires. If I’m seated, the only way I can move my center of mass forward or back is to lower or raise my torso. That’s why this type of climb only works on a nice steady, shallow pitch.
If all of a sudden you have to climb over a rock or roll over a log, you have to do something to get your center of mass forward. Otherwise, that front wheel is not only going to lose directional control, but it may completely come off the ground. So the correction for that is the next type of climb: a crouched climb.
2. Crouched Climb
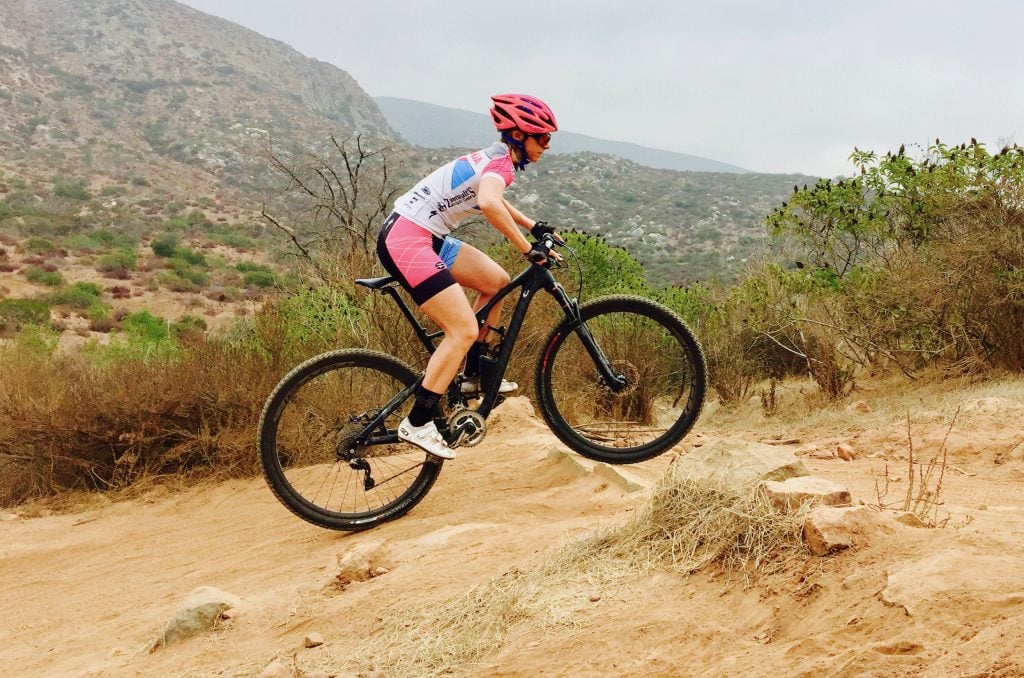
In the crouched climb, you come out of the saddle in what looks like a ready position, but you’re pedaling. You’re out of the saddle, hovering over your seat, and the way you move your weight forward is to move your entire torso forward. Too far forward and you’ll feel the back wheel spin; too far back and you’ll lose steering in the front. That means your torso is constantly moving in a balancing act between coming forward and back. Crouched climb allows you to move your center of mass forward enough to keep your tires weighted evenly when the grade becomes steeper either momentarily for an obstacle in the trail, or as the terrain becomes too steep for a seated climb.
In both of these types of climbs It’s important to select an easy gear so you can pedal with a high cadence. This way, the power stroke (from one o’clock to five o’clock on your crank arm) happens more often providing better traction. Too slow a cadence, and you risk surging the back wheel and losing traction. The power stroke is happening less often with more power resulting in spinning out.
Also, an easier gear/higher cadence means you’ll be able to climb longer with fatigue setting in later. Your legs will quickly tire out pushing a heavy gear at a low cadence. Make sure your bike is geared appropriately. If you’re climbing up your favorite grade and you can only maintain 45 rpm before red lining in your easiest gear, you might want to consider smaller front chain rings.
The video above illustrates the transition from seated to crouched climb. You’ll notice as the terrain pitches up momentarily (the rocks on the trail) Courtney raises off the saddle and comes forward while keeping her torso down. She does this to keep even weight on the tires which prevents the front of the bike from getting light and potentially coming off the ground.
3. Standing Climb
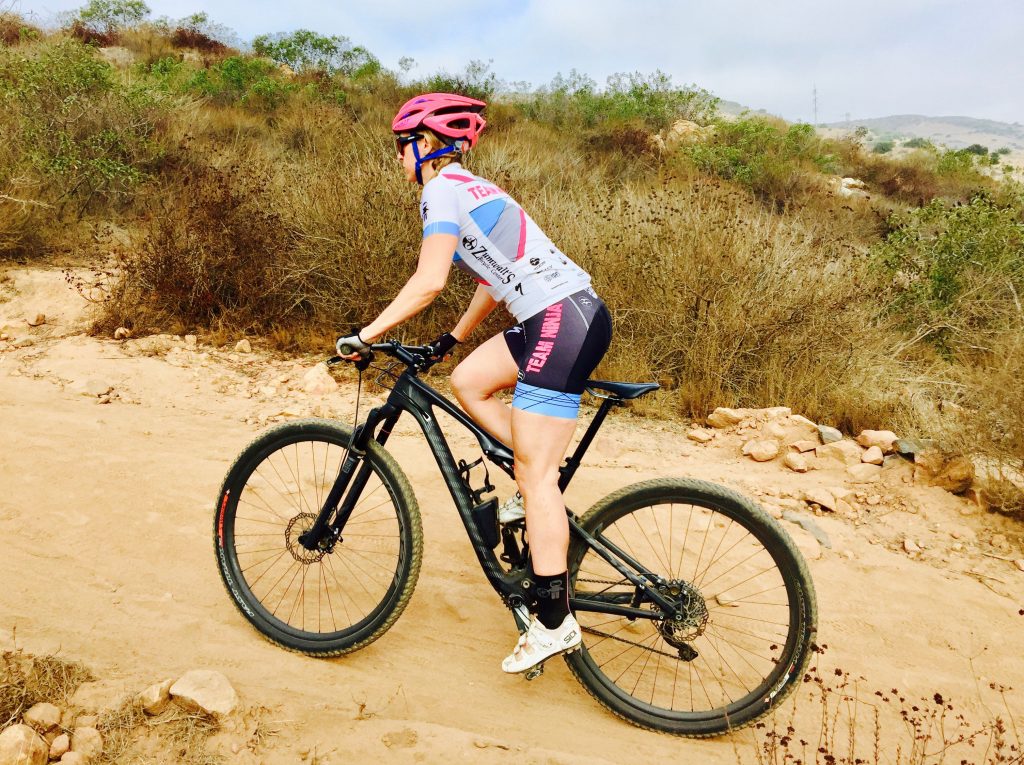
The Standing Climb has two variations. It is used if your seated-climb muscles are getting tired and you want to get a break. Shift into two harder gears, come out of the saddle and use your body weight to help turn the pedals over. Changing from a seated or crouched climb position to a standing climb allows you to give one set of muscles a rest while you use a different set.
The video above illustrate a standing climb, you’ll notice this looks similar to the crouched climb but in this climb, Courtney’s torso is more upright. She’s also more forward on the bike allowing her to use he body weight to assist in turning the pedals over.
The next variation, we like to call the “hurt your feelings” standing climb. This is used in competitive situations—that can be in a race or riding with your friends. Here’s how it works: You’re riding along down a trail and one or more riders are in front of you heading up a short climb either in a seated or crouched climb. You spot them one hundred or so yards back and switch into a standing climb … but not your average standing climb. You want to engage every muscle from your pinky toe to your ears and apply all the power you have to quickly get to the riders and pass them at the right moment. You have to make sure you save just enough breath to say something like “good job” or “keep it up.” This is a particularly effective race strategy because the people that you pass think one of two things. Thing one: “Wow that racer is awesome. There’s no way I’m going to catch up.” Or more likely, they’re thinking, “That racer is an idiot; there’s no way you can maintain that pace and I will catch them around the corner.” Either one is great, because what they don’t know is before you saw them, you were going at roughly the same pace. Once you pass and get out of sight, you go back to the same pace again. Only now, you’re in front.
4. Walking Climb
When the first three climbs fail, you have one more option: The walking climb. This is the climb you use when you just need to get up, whether it’s a race course, technical climb, or you’re just tired and hungry. The key to the walking climb is the dismount.
It’s best to dismount the bike on your terms—don’t wait until you lose your balance, or control. First, apply your brakes and hold them. Then put a foot out to the uphill side of the trail (the side that’s closest to you). If you dismount on the downhill side, you’re more likely to tumble down the side of a hill. With your foot on the uphill side, you create a tripod between you and your tires. Next, swing your leg over the back of the bike (it should be easy because the bike will be leaning a little lower) and plant it safely on the trail. Then quickly grab the top tube and pull it out of the trail so a rider or racer behind you can continue on their way.
Bonus: The Canadian Carry
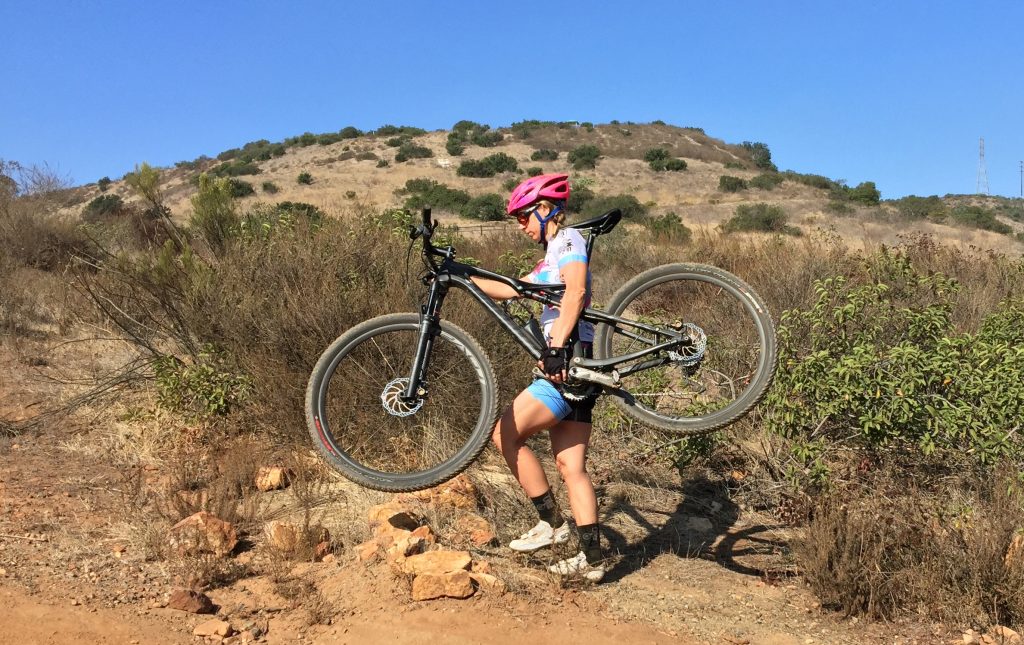
Maybe at this point you want to try to remount, or else continue uphill using the walking climb. If that’s the case, reach over and pick up your bike on the downtube (just ahead of the bottom bracket) with your arm extended. Depending on your seat height, your saddle might fit nicely over your shoulder. We call this the Canadian Carry because a Canadian showed us this. This is an effective way to carry the bicycle because with your arm fully-extended, you’re not contracting any muscles so it’s easy to hold the bike without fatigue. Not using the Canadian carry on a walking climb can result in your arm being really tired at the top of the climb. There is usually a downhill on the other side of the uphill, and having a tired arm can impact your ability to control the bike for the fun part.
Technical Climbing:
For some great tips on technical climbing, checkout this post about Aaron Lucy’s lessons learned about living in Colorado here.
Special thanks to Courtney Cowan for demoing these climbing techniques. Courtney is a Team Ninja rider and the owner of Real Health, a coaching program proven to bridge the gap between wanting to be healthy and becoming who you’ve always wanted to be. Stop Dieting. Start Living. www.realhealth-coaching.com


Sitting and spinning works on smooth steeps, but on the steepest trails I can barely ride, I’ve found that one gear up from lowest is the best compromise when smaller rocks and steps may be deal-breakers. It gives me a little surge to clear an obstacle, but keeps the pedal from arcing too low too close to the thing I’m trying to get over. It puts me into my red zone, so can be maintained only for a few yards at a stretch, meaning I can’t clean my hardest trails unless I’m above a decent fitness point, but can still be used for shorter sections – I just don’t last as long and eventually have to put a foot down.
Seated climbing can be more dynamic with the addition of a firm push forward on the grips. Time them with the weak part of the pedal stroke.
I originally saw elite cross country riders on a furious pace on steep hills, they were so smooth at it I could hardly tell what they were doing.