10% off Jump Ramps | Code: MOBILE10 | Exp. Fri 4/19

Ninja Mountain Bike Performance - Skills Clinics, MTB Jump Ramps and Bike Stands

“I learned the hard way so you don’t have to.” Jumping tips from Ninja Instructor Jeremiah “Scratch” Stone.

My relationship with jumping bikes started young and blossomed over three decades of boosting every single thing I could find or build. As a kid, I liberated wheelbarrows full of dirt from my Mama’s garden to build a jump. From there, I worked up to dirt jumps, table tops and gap jumps. With no instructor to point out my mistakes, I wiped out in every single way possible. I learned how to jump the hard way; with bumps, bruises and broken equipment. Lucky for you, I’m here to help you skip the painful lessons and get right to the good stuff. Here are my 5 Tips for Jumping Success:

1. Bike Setup

Set your sag properly! The term sag refers to the amount of suspension travel that is used when you are on your bike in a riding position. Not sure how to set your sag? Here’s how.

Remember, your shocks, just like tires, will lose a little pressure over time. Make sure your pressure (aka sag) is set correctly periodically to ensure your bike is riding to its full potential.

Next, learn about rebound (the rate at which your suspension returns after a compression) and tune it. The key with this is balance. You want your front and rear suspension behaving similarly. I prefer my rides at about 20% sag with fast rebound action. To check if rebound is balanced, pay attention to how the bike behaves when you bounce it. From there, ride into a section of trail you’re familiar with over and over again. Is the rear end coming up too much? Is the front end diving? If you feel yourself bouncing on landings, your rebound might be set too quick. Think of it like two pogo sticks – get them to work together!

Jeremiah "Scratch" Stone Jumping Tips

2. Mental Approach

There’s a concept in trail building (and riding) that every feature is there to serve the next. Think about this: that berm is there to serve the next section by redirecting you and giving you the platform to enter it with more momentum. That roller is there for pumping or speed checking or maybe preloading. Don’t fight the flow of the trail – learn to use it to your advantage.

Now, apply this concept to jumping! Most jump lines are ascending, a type of crescendo where each jump leads you into another as they increase in size, hang time, intensity, etc. The face of the jump serves the landing. When I approach a jump, my main concern is where and how I want to land.
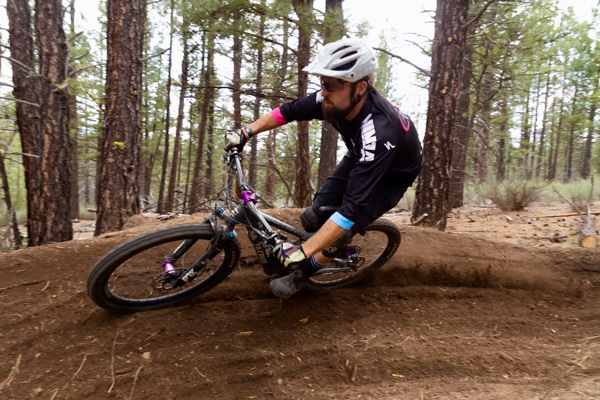
3. Control the Bike

Don’t get lazy halfway through. This usually leads to a “dead sailor” or “pencil” effect where pretty much nothing goes right and you look like a dork. Commit to placing the bike on the landing. Think about pumping the backside, pushing the bike into the landing when you get there and rolling it out clean. For me, I commit to a little bit of hip movement from the very beginning. It helps me maintain control, keeps my body and mind in tune, and sometimes turns into a steezy little whip action. From the innocent bystander’s point of view, it looks intentional and awesome. Inside my mind, this little movement gives me something to focus on in flight, which helps my entire body and nervous system do what it needs to do.

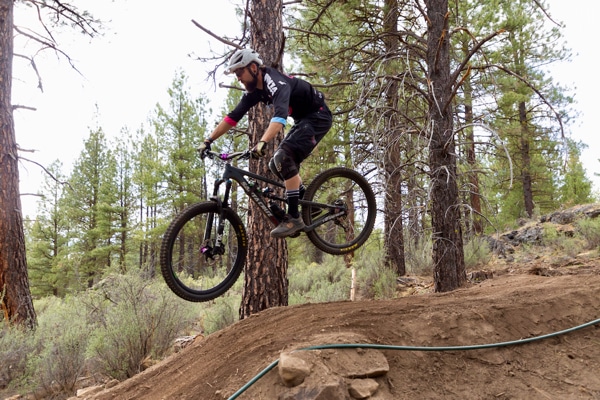
4. The Landing is What Matters

Begin with the end in mind (for all my 7 Habits nerds out there). What’s the goal? Hopefully the goal is the clear the jump and make it look effortless (and cool).

Pop Quiz! Where should you be landing?

a) The very peak tip top edge after the gap

b) The edge of the tabletop where it first starts to descend

c) The flat area just past the jump

d) The meaty part of the decline where your whole bike has a great landing surface and nice run-out.

Ding ding ding ding! If you answered “d”, you are correct. If you aim short, you’ll come up short and case the jump (whomp whomp). Your landing is well past that edge or peak.

Put the bike on the landing. Read that again. PUT the bike where you want it. I see so many people think that all they have to do is mash into a jump face and somehow the universe will just take care of them. Remember, the face and lip of a jump is just the beginning. It’s the landing that you need. More details on The What, Why and How of Jumping your Mountain Bike.

5. Be Mechanically-minded

Think about the mechanics of what is going on when you are jumping your bike. Geek out and think physics. Force, inertia, all that stuff. Then you’ll start to read jumps and anticipate how they’ll affect you. Jumps with a bigger face may feel earlier to learn on than jumping with a small face, because your entire bike fits on the face. Small face jumps on the other-hand can feel like you are jumping twice – once with the front end, then the rear. Steep faces will send you up. Mellow faces are usually easier to control because they have less influence on the bike and body. Step ups are more forgiving because they take a lot of the drop out of play, so you essentially only have to get the first half of the jump correct. Step downs are easier to over shoot and therefore need plenty of room to land. If you can consistently clear a 10ft table, you can clear a gap with the same characteristics.

Now it’s time to go ride your bike and have the most fun possible!

Ready to learn more and practice your jumping in a safe, controlled environment with real-time feedback? Join us for a Jumping Fundamentals Mini-clinic!

2 Responses

  1. This post is well enough to understand the advantage and disadvantage between road bike and mountain bike. Your provided ideas are very helpful for the bikers. I’m little bit confused of which one is much better for me. Now I fix my decision. I should thanking you a lot for this unique ideas.

Leave a Reply

Your email address will not be published. Required fields are marked *

keep me in the loop

NOTIFY ME!

I’d like to be notified when new events are added.

Your Privacy is Protected. We will never sell or share your information.

Fundamentals Trail Application - Women's Only

Here’s What We’ll Cover

The specific skills taught in this clinic will depend on available trail features and will vary between locations. Skills covered may include:

  • Rock / Log Step-Ups 
  • Pedal Assisted Front Wheel Lifts
  • Steep Transitions, Roll-Downs
  • Reading trail and line choice
  • Using trail features for maximum flow
  • Turning (Low Speed)
  • Navigating Trail Obstacles
  • Switchbacks – Optimal Line Choice
  • Ratcheting application – how & when 
  • Track stands
  • Braking for Speed 
  • Shifting – Timing + Technique on Technical Terrain
  • Skinnies
  • Off-Camber Trails 
  • Berms 
  • Water crossings 
  • Roots 

The Schedule*

  • 1:15-1:30pm Meet your instructor  | Arrival at course venue + equipment check
  • 1:30 – 1:45pm Fundamentals Skills | Rapid Review 
  • 1:45 – 3:45pm Coached Trail Ride | Sessioning & Skills Application
  • 3:45-4:00pm Review, questions & next steps | #Ridelikeaninja

*Clinic schedule and skills covered may vary according to location and terrain.

Fundamentals Trail Application

Here’s What We’ll Cover

The specific skills taught in this clinic will depend on available trail features and will vary between locations. Skills covered may include:

  • Rock / Log Step-Ups 
  • Pedal Assisted Front Wheel Lifts
  • Steep Transitions, Roll-Downs
  • Reading trail and line choice
  • Using trail features for maximum flow
  • Turning (Low Speed)
  • Navigating Trail Obstacles
  • Switchbacks – Optimal Line Choice
  • Ratcheting application – how & when 
  • Track stands
  • Braking for Speed 
  • Shifting – Timing + Technique on Technical Terrain
  • Skinnies
  • Off-Camber Trails 
  • Berms 
  • Water crossings 
  • Roots 

The Schedule*

  • 1:15-1:30pm Meet your instructor  | Arrival at course venue + equipment check
  • 1:30 – 1:45pm Fundamentals Skills | Rapid Review 
  • 1:45 – 3:45pm Coached Trail Ride | Sessioning & Skills Application
  • 3:45-4:00pm Review, questions & next steps | #Ridelikeaninja

*Clinic schedule and skills covered may vary according to location and terrain.

Ninja Kids clinics

Here’s What We’ll Cover

Some of the skills taught and practiced in the Kids Fundamentals Clinic may include:

  • Ninja (Ready) Position
  • The Riding Rainbow: Body Position
  • How to use your gears
  • Front + Rear Wheel Lifts
  • Safely getting on/off your bike
  • Getting over trail obstacles
  • Turning + Switchbacks
  • Reading the trail: Red Light, Yellow Light, Green Light
  • When and how to brake
  • The 4 Climbing Positions
  • Descending in control
  • How to have fun and be safe!
  • Safety check, bike care

Clinic schedule, time and skills covered may vary according to location and terrain.

2-Day CAMPS

Sample Camp Schedule*

Day 1 (Saturday)

  • 8:45-9:00 Meet your instructor  | Arrival at course venue + equipment check
  • 9:00-9:15 Let’s get started | Introductions, camp overview, bike safety check, bike set-up review
  • 9:15-9:30 Warm-up ride | Head to skills area
  • 9:30-12:15 Mornings skills session | Ready position, bike-body separation, effective braking, fluid shifting, body positioning, wheel lifts
  • 12:15-1:30 Lunch break | BYO
  • 1:30 – 4:00 Intro to jumping | Manuals, bunny hops + how to safely jumping (and land) your mountain bike

Day 2 (Sunday)

  • 8:45-9:00 Meet at trailhead | Gear up for day 2!
  • 9:00-9:15 Review | Brief review of Day 1 skills
  • 9:15-12:00 Morning skills session | High-speed cornering, switchbacks, drops, rock dodge, technical climbing & descending
  • 12:00-1:00  Lunch break | BYO
  • 1:00-3:45 Trail ride + skills application | Put those skills to work!
  • 3:45-4:00 Review, questions & next steps | #Ridelikeaninja


*Clinic schedule and skills covered may vary according to location and terrain.

After camp, you will see an immediate improvement in your riding and a boost in confidence on technical trails. You will be able to tackle rougher terrain and corners with greater control and flow through singletrack, switchbacks, and berms with more speed and efficiency.

Jumping Mini-Clinics

Here’s What We’ll Cover

Some of the skills taught and practiced in the Jumping Mini-Clinic may include:

  • Wheel lift Review
  • Bunny hops
  • Jumping body positioning
  • Anatomy of a jump
  • Speed vs. compression | How and when?
  • Landing with precision
  • Let’s get jumping! | Jump progressions

The Schedule*

Please note, clinics may vary according to location and terrain.

  • 1:30-1:45  Meet your instructor | Arrival at course venue + equipment check
  • 1:45-2:00 Let’s get started | Introductions
  • 2:00 – 2:30  Intro to jumping | Wheel lifts, manual, bunny hop
  • 2:30 – 3:00 Reading the jump | Anatomy of a jump, speed vs compression, landings
  • 3:00 – 3:45 Let’s jump! | Jumping progressions on table tops
  • 3:45-4:00 Review and next steps | #ridelikeaninja


*Clinic schedule and skills covered may vary according to location and terrain.

Intermediate / advanced clincs

Here’s What We’ll Cover

Some of the skills taught and practiced in the Intermediate/Advanced clinic may include:

  • Negotiating trail obstacles (i.e. rock gardens, roots, logs)
  • Steep transitions
  • Drops
  • High speed cornering
  • Technical climbing
  • Technical descending
  • Advanced braking
  • Reading the trail
  • Introduction to energy management & flow
  • Pumping for speed & air
  • Technical Switchbacks (where available)
  • Ratcheting & Trackstands
  • Visualization

The Schedule*

  • 8:45-9:00 Meet your instructor  | Arrival at course venue + equipment check
  • 9:00-9:15 Let’s get started | Introductions
  • 9:15-9:45 Accelerated review of Fundamentals | With intermediate+advanced progressions
  • 9:45-12:00 Morning skills session | High-speed cornering, Switchbacks, drops, rock dodge, technical climbing & descending
  • 12:00-1:00  Lunch break | BYO
  • 1:00-3:45 Trail ride + skills application | Put those skills to work!
  • 3:45-4:00 Review, questions & next steps | #Ridelikeaninja

*Clinic schedule and skills covered may vary according to location and terrain.

WOMEN'S ONLY Fundamentals Combo

Here’s What We’ll Cover

The specific skills taught in this clinic will depend on available trail features and will vary between locations. Skills covered may include:

  • The Ready Position
  • Bike/Body Separation
  • Intro to Steep Transitions
  • Effective Braking
  • Braking for speed
  • Wheels lifts – Step-Ups
  • Shifting, Timing & Cadence
  • Negotiating trail obstacles
  • Turning / Switchbacks
  • Climbing + Descending
  • Dismounting
  • Mind skills
  • Steep Transitions, Roll-Downs
  • Reading trail and line choice
  • Using trail features for flow
  • Turning (Low Speed)
  • Ratcheting – how & when 
  • Track stands
  • Skinnies
  • Off-Camber Trails
  • Berms
  • Water crossings
  • Roots

The Schedule*

  • 8:45-9:00  Meet your instructor  | Arrival at course venue + equipment check
  • 9:00-9:15 Let’s get started | Introductions
  • 9:15am – 11:15 Skills & drills | Learn, learn, learn
  • 11:15am – 12:15 Take it to the trail | Apply what you’ve learned
  • 12:15 – 1:30pm Lunch Break | Rest & Refuel
  • 1:30 – 1:45pm Fundamentals Skills | Rapid Review 
  • 1:45 – 3:45pm Coached Trail Ride | Sessioning & Skills Application
  • 3:45-4:00pm Review, questions & next steps | #Ridelikeaninja

*Clinic schedule and skills covered may vary according to location and terrain.

Co-ed Fundamentals Combo

Here’s What We’ll Cover

The specific skills taught in this clinic will depend on available trail features and will vary between locations. Skills covered may include:

  • The Ready Position
  • Bike/Body Separation
  • Intro to Steep Transitions
  • Effective Braking
  • Braking for speed
  • Wheels lifts – Step-Ups
  • Shifting, Timing & Cadence
  • Negotiating trail obstacles
  • Turning / Switchbacks
  • Climbing + Descending
  • Dismounting
  • Mind skills
  • Steep Transitions, Roll-Downs
  • Reading trail and line choice
  • Using trail features for flow
  • Turning (Low Speed)
  • Ratcheting – how & when 
  • Track stands
  • Skinnies
  • Off-Camber Trails
  • Berms
  • Water crossings
  • Roots

The Schedule*

  • 8:45-9:00  Meet your instructor  | Arrival at course venue + equipment check
  • 9:00-9:15 Let’s get started | Introductions
  • 9:15am – 11:15 Skills & drills | Learn, learn, learn
  • 11:15am – 12:15 Take it to the trail | Apply what you’ve learned
  • 12:15 – 1:30pm Lunch Break | Rest & Refuel
  • 1:30 – 1:45pm Fundamentals Skills | Rapid Review 
  • 1:45 – 3:45pm Coached Trail Ride | Sessioning & Skills Application
  • 3:45-4:00pm Review, questions & next steps | #Ridelikeaninja

*Clinic schedule and skills covered may vary according to location and terrain.

Ninja MTB Logo

Women's Only Fundamentals Clinics

Level 1 - Here’s What We’ll Cover

Some of the skills taught and practiced in the Women’s Only Fundamentals Clinic may include:

  • The Ready Position
  • Bike/Body separation
  • Intro to Steep Transitions
  • Effective braking
  • Wheels lifts
  • Shifting + cadence
  • Negotiating trail obstacles
  • Turning / Switchbacks
  • Climbing + Descending
  • Dismounting
  • Mind skills

The Schedule*

  • 8:45-9:00  Meet your instructor  | Arrival at course venue + equipment check
  • 9:00-9:15 Let’s get started | Introductions
  • 9:15am – 11:15 Skills & drills | Learn, learn, learn
  • 11:15am – 12:00 Take it to the trail | Apply what you’ve learned
  • 12:00-12:15 Review and next steps | #ridelikeaninja
 

*Clinic schedule and skills covered may vary according to location and terrain.

Ninja MTB Logo

Co-ed Fundamentals Clinics

Level 1 - Here’s What We’ll Cover

Some of the skills taught and practiced in the Fundamentals Clinic may include:

  • The Ready Position
  • Bike/Body separation
  • Intro to Steep Transitions
  • Effective braking
  • Wheels lifts
  • Shifting + cadence
  • Negotiating trail obstacles
  • Turning / Switchbacks
  • Climbing + Descending
  • Dismounting
  • Mind skills

The Schedule*

  • 8:45-9:00  Meet your instructor  | Arrival at course venue + equipment check
  • 9:00-9:15 Let’s get started | Introductions
  • 9:15am – 11:15 Skills & drills | Learn, learn, learn
  • 11:15am – 12:00 Take it to the trail | Apply what you’ve learned
  • 12:00-12:15 Review and next steps | #ridelikeaninja
 

*Clinic schedule and skills covered may vary according to location and terrain.

LEAVING SO SOON?

60% Off

IF YOU SIGN UP FOR A MTB SKILLS CLINIC TODAY!

Enter your email below to get your limited time coupon code (valid for 48 hours).

Valid on all Skills Camps and Clinics. Your Privacy is Protected.

Awesome sauce!

60% Off

USE THIS CODE TO SIGN UP TODAY!

CHECKOUT4XY2

*Limited time offer. Valid for 48 hours on any upcoming MTB skills clinic or camp.