10% off All Jump Ramps | Use Code: MOBILE10 | Expires Fri 4/19 

Picture this: it’s the exact moment that you settle into the flow of a descent when the singletrack throws a hard left or right at you. You lay on the brakes, eek your way around the turn, pedal like mad to get back up to speed and do your best to find your rhythm again… sound familiar?

You’re not alone. It’s one of the most common questions we get asked:

How the heck do I keep my flow and momentum through corners and switchbacks?!

– Every rider ever

Meet the Pre-Turn – a game-changing technique that’s the key to smooth, fast corners. Are you ready?!

Let’s say you’re approaching a left-hand corner or switchback. What are your line options?

1. Inside line

If you approach the corner from inside line (left side of the trail), it will be considerably tighter and sharper and you’ll be unable to carry momentum through it. Plus, your rear wheel always tracks even further inside than your front wheel where it can slip (as shown in the video) or get hung up on an obstacle like a rock or root.

2. Outside line

If you approach the same corner from the outside line (right side of the trail), it will increase the corner’s radius making the corner wider and therefore faster. But beware!  There are often sketchier conditions on the outside line such as loose dirt with less traction or broken off trail edges. Additionally, it doesn’t leave you room to go wider if you mis-calculate your speed or the corner’s radius (as shown in the video) – there’s no buffer zone. 
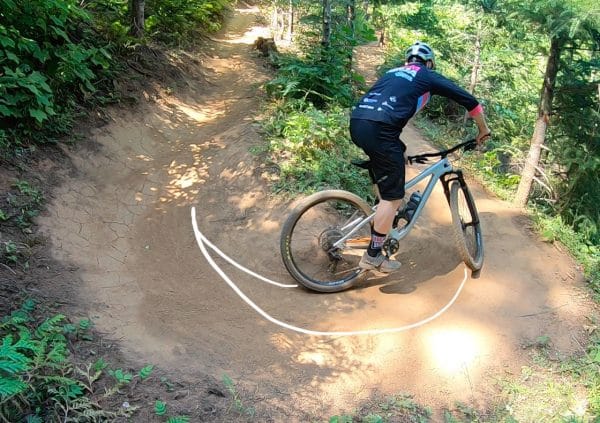
3. Pre-Turn

If you’re wondering “what the heck is a pre-turn?” you’re not alone. It’s a turn in the opposite direction of the corner that moves the apex earlier in corner.

Try this: 

  1. Approach on the inside line of the corner
  2. Prior to the apex, turn right (opposite the direction you intend to turn)
  3. Transition smoothly into a left turn

Putting these two turns together, the first being a “pre-turn” and the second being the direction of the corner, makes for a very smooth, controlled corner.

Keys to success

Bike-body separation – Separate yourself from the bike by swinging your hips to the outside of the corner and keeping your knees wide to allow the bike to lean beneath you. This separation will naturally allow your outside foot to come to the down position which leads us to…

Footwork – Your outside foot should be down opposite the direction you’re leaning the bike. So, in this case of a left corner, your left foot should be down for the pre-turn, then as you transition to the actual turn, your right foot should be down. Focus on the smooth application of this footwork

It’s a Mystery

While we have no simple explanation of why, two turns back-to-back is wayyyyy smoother than any one turn.  And for some unknown reason, when you add a pre-turn you’ll shift your focus from dragging your brake into the corner into good footwork and compression… and that means SMOOTH and FAST!

Next, check out the Secret to Switchbacks and How to Corner Like a Pro to add more Ninja skills to your toolbox!

11 Responses

  1. Sorry….. but gotta call you out. Here goes:

    No explanation of why it works? Well, the first turn is unnecessary; just set-up wide and make the smoothest possible arc through the corner. That’s what’s working—the wider arc. Also, you shouldn’t drop both feet—you really shouldn’t turn twice. No real rider drops a left foot, turns right, then drops a right foot around the left corner (if the foot needs to drop around the left—the real corner—for the correct reasons, that’s ok).

    Can you show me someone doing this in high level DH or Enduro racing? Answer: no. Also, teaching beginners, intermediated, etc., this will create bad habits and is dangerous (pedal strikes and just bad technique).

    Also, you won’t be able to brake well at all if you’re putting a turn before your turn—especially if you’re dropping a foot. And, this “technique” will be nearly impossible to do with any speed on any steep or difficult trail.

    I’m not trying to be a jerk, but this isn’t a technique that is used by decent riders (set up wide? Sure. But the “two turn” thing? You won’t see it)

    This bums me out because teaching this kind of BS is bad for the business of mtb coaching. There are all kinds of real and relevant cornering techniques you could teach. Please stick to those. This “two turn” deal is the kind of thing that turns people away from mtb coaching. And that upsets me and takes away from my business.

    If you’re coaching good stuff that ALL riders can benefit from, cool. There’s plenty to go around. But this sort of 2-turn thing is pretty kooky, people will get that and now, collectively, mtb coaching takes a hit.

    Sorry. But I have a tough time letting stuff like this slide…

    1. Hey Andy — thanks for taking the time to comment!

      Happy to share some more examples of your points / comment / questions:

      Check this video from Simon Lawton (x-pro DH rider, Ninja contributor and friend), he breaks this down a bit further and provides a solid demo: https://www.youtube.com/watch?v=4t5-IYpVIe4

      Also, another great explanation of foot work with detail and demos here: https://www.youtube.com/watch?v=hYBGoDo8VLE

      And YES — every single DH rider on a pro level does this.

      Are you ever in Oregon? If so, stop by — I’d be happy to meet up for coffee and review some slow-mo with you of the worlds top riders.

      Richard / NINJA

      P.S. You run a MTB coaching business, right?

    2. Andy,

      “…just set-up wide and make the smoothest possible arc through the corner.”
      Yes – the pre-turn is a way to “just set-up wide”, which then allows you more space to make the “smoothest possible arc through the corner” and allows you the ability to make adjustments as needed due to terrain.

      This video is very basic and the movements exaggerated. As an experienced coach I am sure that you are well aware that you need to exaggerate your demos so your students do at least half of what you are teaching/showing them. Also, the pre-turn can later lead to more aggressive forms of opening up turns and controlling the arc/radius, which is something seen in many pro races – both DH and Enduro, heck even in cyclocross we use this move sometimes. I am not saying that this is for every turn, but it is a great piece of knowledge and a skill to have in your toolbox.

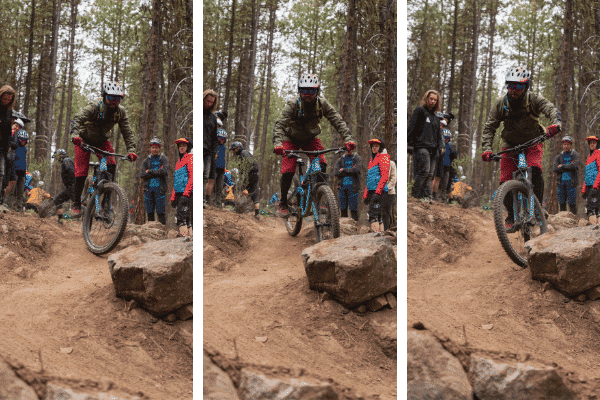
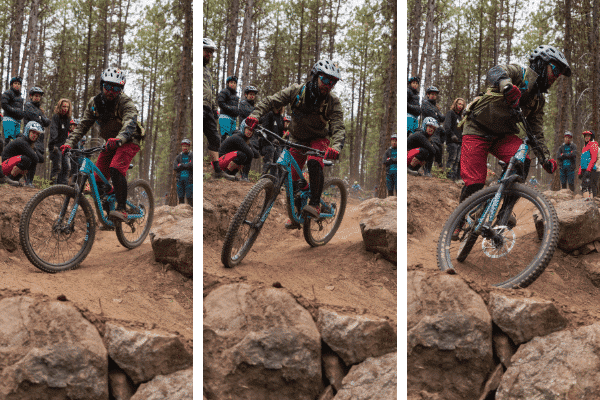
      It is even helpful on up hill switchbacks when you need to avoid obstacles. It is useful anytime that you need to control arcs that your wheels track around corners.

      What is a Pre-turn? | Mountain bike skills with Simon Lawton from Fluidride https://youtu.be/4t5-IYpVIe4

      How To Ride Tight & Steep Switchback Corners On Your Mountain Bike https://youtu.be/3Q_yJHwLJ_A?t=258

      Sam Hill Takes On The Hot Lap Challenge | Pinkbike Hot Laps https://youtu.be/VcsHib1ovs4?t=275

      How To Ride Blind Corners | Mountain Bike Skills https://youtu.be/9O-hgnV9zVY?t=120

      How To Ride Tight Corners – Trail Tips with Nathan McComb – Ep2 https://youtu.be/FbJpsoeC_T0?t=122

      How To Ride The High Line | MTB Skills https://youtu.be/3Bst1uxSS80?t=211

      EWS 7: A French Classic. Valberg-Guillaume’s Highlights, France https://youtu.be/1IiLhIekHZE?t=1066 (Nicolas Vouilloz – 10 time Downhill Mountain Bike World Champ)
      https://youtu.be/1IiLhIekHZE?t=1079
      https://youtu.be/1IiLhIekHZE?t=1348

      ENDURO WORLD SERIES VITAL RAW – Getting Buck Wild in France! https://youtu.be/L1TI0Uw9-48?t=300 (Ritchie Rude pre-turn to open up the corner)

      How to improve your line choice https://youtu.be/JPcmATYqop0

  2. This looks a lot like a technique called counter steering that is used for high speed turns on everything from motorcycles to fire trucks. The dynamics of shifting the mass in one direction before turning sharper in the opposite direction may seem counterintuitive but trust me they do work (:

  3. Physics….it’s all in the physics – we need a science guru to weigh in and explain how this technique affects the interim of bike and rider. Any science stud(ess)es out there?

  4. One explanation that I have seen (which is probably in one of the many linked videos in the earlier comments) is that the pre-turn sets the rear wheel on a better line so that it hits the apex of the turn closer to the same line as the front wheel rather than tracking farther in. If you’ve ever seen an 18-wheeler (or anything pulling a trailer) make a right turn, that’s exactly the same technique they use to get the trailer on a wider track so it doesn’t clip the inside of the turn.

  5. Counter-steering, as applied to M/C’s, works at speeds over 10mph, (poss. a little less). Bicycles are similar.
    By turning the front wheel a little away from the corner, ( i.e. right when intending to turn left) you change the geometry of the bike. Apparently, we do this subconsciously on bicyles & combine it with body lean.
    The change of geometry has the effect of tilting the bike into the intended corner direction. At higher speeds, particularly m/c racing, it helps when you have to turn the bike very fast & as a rule, they are a big heavy lump to turn, compared to a bicycle.
    I think if you just turn the wheel say left for a left corner, it’s ok at very slow speeds but doesn’t work when going faster. You actually need the (counter intuitive) change of geometry to make the corner. There are numbers of YouTube vids about it.
    Obv. with bicycles, you have pedal position to consider & have to prepare accordingly. We all know what a pedal strike can do!

Leave a Reply

Your email address will not be published. Required fields are marked *

keep me in the loop

NOTIFY ME!

I’d like to be notified when new events are added.

Your Privacy is Protected. We will never sell or share your information.

Fundamentals Trail Application - Women's Only

Here’s What We’ll Cover

The specific skills taught in this clinic will depend on available trail features and will vary between locations. Skills covered may include:

  • Rock / Log Step-Ups 
  • Pedal Assisted Front Wheel Lifts
  • Steep Transitions, Roll-Downs
  • Reading trail and line choice
  • Using trail features for maximum flow
  • Turning (Low Speed)
  • Navigating Trail Obstacles
  • Switchbacks – Optimal Line Choice
  • Ratcheting application – how & when 
  • Track stands
  • Braking for Speed 
  • Shifting – Timing + Technique on Technical Terrain
  • Skinnies
  • Off-Camber Trails 
  • Berms 
  • Water crossings 
  • Roots 

The Schedule*

  • 1:15-1:30pm Meet your instructor  | Arrival at course venue + equipment check
  • 1:30 – 1:45pm Fundamentals Skills | Rapid Review 
  • 1:45 – 3:45pm Coached Trail Ride | Sessioning & Skills Application
  • 3:45-4:00pm Review, questions & next steps | #Ridelikeaninja

*Clinic schedule and skills covered may vary according to location and terrain.

Fundamentals Trail Application

Here’s What We’ll Cover

The specific skills taught in this clinic will depend on available trail features and will vary between locations. Skills covered may include:

  • Rock / Log Step-Ups 
  • Pedal Assisted Front Wheel Lifts
  • Steep Transitions, Roll-Downs
  • Reading trail and line choice
  • Using trail features for maximum flow
  • Turning (Low Speed)
  • Navigating Trail Obstacles
  • Switchbacks – Optimal Line Choice
  • Ratcheting application – how & when 
  • Track stands
  • Braking for Speed 
  • Shifting – Timing + Technique on Technical Terrain
  • Skinnies
  • Off-Camber Trails 
  • Berms 
  • Water crossings 
  • Roots 

The Schedule*

  • 1:15-1:30pm Meet your instructor  | Arrival at course venue + equipment check
  • 1:30 – 1:45pm Fundamentals Skills | Rapid Review 
  • 1:45 – 3:45pm Coached Trail Ride | Sessioning & Skills Application
  • 3:45-4:00pm Review, questions & next steps | #Ridelikeaninja

*Clinic schedule and skills covered may vary according to location and terrain.

Ninja Kids clinics

Here’s What We’ll Cover

Some of the skills taught and practiced in the Kids Fundamentals Clinic may include:

  • Ninja (Ready) Position
  • The Riding Rainbow: Body Position
  • How to use your gears
  • Front + Rear Wheel Lifts
  • Safely getting on/off your bike
  • Getting over trail obstacles
  • Turning + Switchbacks
  • Reading the trail: Red Light, Yellow Light, Green Light
  • When and how to brake
  • The 4 Climbing Positions
  • Descending in control
  • How to have fun and be safe!
  • Safety check, bike care

Clinic schedule, time and skills covered may vary according to location and terrain.

2-Day CAMPS

Sample Camp Schedule*

Day 1 (Saturday)

  • 8:45-9:00 Meet your instructor  | Arrival at course venue + equipment check
  • 9:00-9:15 Let’s get started | Introductions, camp overview, bike safety check, bike set-up review
  • 9:15-9:30 Warm-up ride | Head to skills area
  • 9:30-12:15 Mornings skills session | Ready position, bike-body separation, effective braking, fluid shifting, body positioning, wheel lifts
  • 12:15-1:30 Lunch break | BYO
  • 1:30 – 4:00 Intro to jumping | Manuals, bunny hops + how to safely jumping (and land) your mountain bike

Day 2 (Sunday)

  • 8:45-9:00 Meet at trailhead | Gear up for day 2!
  • 9:00-9:15 Review | Brief review of Day 1 skills
  • 9:15-12:00 Morning skills session | High-speed cornering, switchbacks, drops, rock dodge, technical climbing & descending
  • 12:00-1:00  Lunch break | BYO
  • 1:00-3:45 Trail ride + skills application | Put those skills to work!
  • 3:45-4:00 Review, questions & next steps | #Ridelikeaninja


*Clinic schedule and skills covered may vary according to location and terrain.

After camp, you will see an immediate improvement in your riding and a boost in confidence on technical trails. You will be able to tackle rougher terrain and corners with greater control and flow through singletrack, switchbacks, and berms with more speed and efficiency.

Jumping Mini-Clinics

Here’s What We’ll Cover

Some of the skills taught and practiced in the Jumping Mini-Clinic may include:

  • Wheel lift Review
  • Bunny hops
  • Jumping body positioning
  • Anatomy of a jump
  • Speed vs. compression | How and when?
  • Landing with precision
  • Let’s get jumping! | Jump progressions

The Schedule*

Please note, clinics may vary according to location and terrain.

  • 1:30-1:45  Meet your instructor | Arrival at course venue + equipment check
  • 1:45-2:00 Let’s get started | Introductions
  • 2:00 – 2:30  Intro to jumping | Wheel lifts, manual, bunny hop
  • 2:30 – 3:00 Reading the jump | Anatomy of a jump, speed vs compression, landings
  • 3:00 – 3:45 Let’s jump! | Jumping progressions on table tops
  • 3:45-4:00 Review and next steps | #ridelikeaninja


*Clinic schedule and skills covered may vary according to location and terrain.

Intermediate / advanced clincs

Here’s What We’ll Cover

Some of the skills taught and practiced in the Intermediate/Advanced clinic may include:

  • Negotiating trail obstacles (i.e. rock gardens, roots, logs)
  • Steep transitions
  • Drops
  • High speed cornering
  • Technical climbing
  • Technical descending
  • Advanced braking
  • Reading the trail
  • Introduction to energy management & flow
  • Pumping for speed & air
  • Technical Switchbacks (where available)
  • Ratcheting & Trackstands
  • Visualization

The Schedule*

  • 8:45-9:00 Meet your instructor  | Arrival at course venue + equipment check
  • 9:00-9:15 Let’s get started | Introductions
  • 9:15-9:45 Accelerated review of Fundamentals | With intermediate+advanced progressions
  • 9:45-12:00 Morning skills session | High-speed cornering, Switchbacks, drops, rock dodge, technical climbing & descending
  • 12:00-1:00  Lunch break | BYO
  • 1:00-3:45 Trail ride + skills application | Put those skills to work!
  • 3:45-4:00 Review, questions & next steps | #Ridelikeaninja

*Clinic schedule and skills covered may vary according to location and terrain.

WOMEN'S ONLY Fundamentals Combo

Here’s What We’ll Cover

The specific skills taught in this clinic will depend on available trail features and will vary between locations. Skills covered may include:

  • The Ready Position
  • Bike/Body Separation
  • Intro to Steep Transitions
  • Effective Braking
  • Braking for speed
  • Wheels lifts – Step-Ups
  • Shifting, Timing & Cadence
  • Negotiating trail obstacles
  • Turning / Switchbacks
  • Climbing + Descending
  • Dismounting
  • Mind skills
  • Steep Transitions, Roll-Downs
  • Reading trail and line choice
  • Using trail features for flow
  • Turning (Low Speed)
  • Ratcheting – how & when 
  • Track stands
  • Skinnies
  • Off-Camber Trails
  • Berms
  • Water crossings
  • Roots

The Schedule*

  • 8:45-9:00  Meet your instructor  | Arrival at course venue + equipment check
  • 9:00-9:15 Let’s get started | Introductions
  • 9:15am – 11:15 Skills & drills | Learn, learn, learn
  • 11:15am – 12:15 Take it to the trail | Apply what you’ve learned
  • 12:15 – 1:30pm Lunch Break | Rest & Refuel
  • 1:30 – 1:45pm Fundamentals Skills | Rapid Review 
  • 1:45 – 3:45pm Coached Trail Ride | Sessioning & Skills Application
  • 3:45-4:00pm Review, questions & next steps | #Ridelikeaninja

*Clinic schedule and skills covered may vary according to location and terrain.

Co-ed Fundamentals Combo

Here’s What We’ll Cover

The specific skills taught in this clinic will depend on available trail features and will vary between locations. Skills covered may include:

  • The Ready Position
  • Bike/Body Separation
  • Intro to Steep Transitions
  • Effective Braking
  • Braking for speed
  • Wheels lifts – Step-Ups
  • Shifting, Timing & Cadence
  • Negotiating trail obstacles
  • Turning / Switchbacks
  • Climbing + Descending
  • Dismounting
  • Mind skills
  • Steep Transitions, Roll-Downs
  • Reading trail and line choice
  • Using trail features for flow
  • Turning (Low Speed)
  • Ratcheting – how & when 
  • Track stands
  • Skinnies
  • Off-Camber Trails
  • Berms
  • Water crossings
  • Roots

The Schedule*

  • 8:45-9:00  Meet your instructor  | Arrival at course venue + equipment check
  • 9:00-9:15 Let’s get started | Introductions
  • 9:15am – 11:15 Skills & drills | Learn, learn, learn
  • 11:15am – 12:15 Take it to the trail | Apply what you’ve learned
  • 12:15 – 1:30pm Lunch Break | Rest & Refuel
  • 1:30 – 1:45pm Fundamentals Skills | Rapid Review 
  • 1:45 – 3:45pm Coached Trail Ride | Sessioning & Skills Application
  • 3:45-4:00pm Review, questions & next steps | #Ridelikeaninja

*Clinic schedule and skills covered may vary according to location and terrain.

Women's Only Fundamentals Clinics

Level 1 - Here’s What We’ll Cover

Some of the skills taught and practiced in the Women’s Only Fundamentals Clinic may include:

  • The Ready Position
  • Bike/Body separation
  • Intro to Steep Transitions
  • Effective braking
  • Wheels lifts
  • Shifting + cadence
  • Negotiating trail obstacles
  • Turning / Switchbacks
  • Climbing + Descending
  • Dismounting
  • Mind skills

The Schedule*

  • 8:45-9:00  Meet your instructor  | Arrival at course venue + equipment check
  • 9:00-9:15 Let’s get started | Introductions
  • 9:15am – 11:15 Skills & drills | Learn, learn, learn
  • 11:15am – 12:00 Take it to the trail | Apply what you’ve learned
  • 12:00-12:15 Review and next steps | #ridelikeaninja
 

*Clinic schedule and skills covered may vary according to location and terrain.

Co-ed Fundamentals Clinics

Level 1 - Here’s What We’ll Cover

Some of the skills taught and practiced in the Fundamentals Clinic may include:

  • The Ready Position
  • Bike/Body separation
  • Intro to Steep Transitions
  • Effective braking
  • Wheels lifts
  • Shifting + cadence
  • Negotiating trail obstacles
  • Turning / Switchbacks
  • Climbing + Descending
  • Dismounting
  • Mind skills

The Schedule*

  • 8:45-9:00  Meet your instructor  | Arrival at course venue + equipment check
  • 9:00-9:15 Let’s get started | Introductions
  • 9:15am – 11:15 Skills & drills | Learn, learn, learn
  • 11:15am – 12:00 Take it to the trail | Apply what you’ve learned
  • 12:00-12:15 Review and next steps | #ridelikeaninja
 

*Clinic schedule and skills covered may vary according to location and terrain.

LEAVING SO SOON?

60% Off

IF YOU SIGN UP FOR A MTB SKILLS CLINIC TODAY!

Enter your email below to get your limited time coupon code (valid for 48 hours).

Valid on all Skills Camps and Clinics. Your Privacy is Protected.

Awesome sauce!

60% Off

USE THIS CODE TO SIGN UP TODAY!

CHECKOUT4XY2

*Limited time offer. Valid for 48 hours on any upcoming MTB skills clinic or camp.