10% off Jump Ramps | Code: MOBILE10 | Exp. Fri 4/19

Is your braking holding you back?

Much of an experienced mountain biker’s control, skill and speed lies both in the way they use their brakes (ease the squeeze!) AND the way they set-up their brake controls on the bars.   In this article, we’re going to focus on the importance of proper set-up of your brake levers.   Correct brake lever positioning is a critical component to maintaining positive control of your bike.

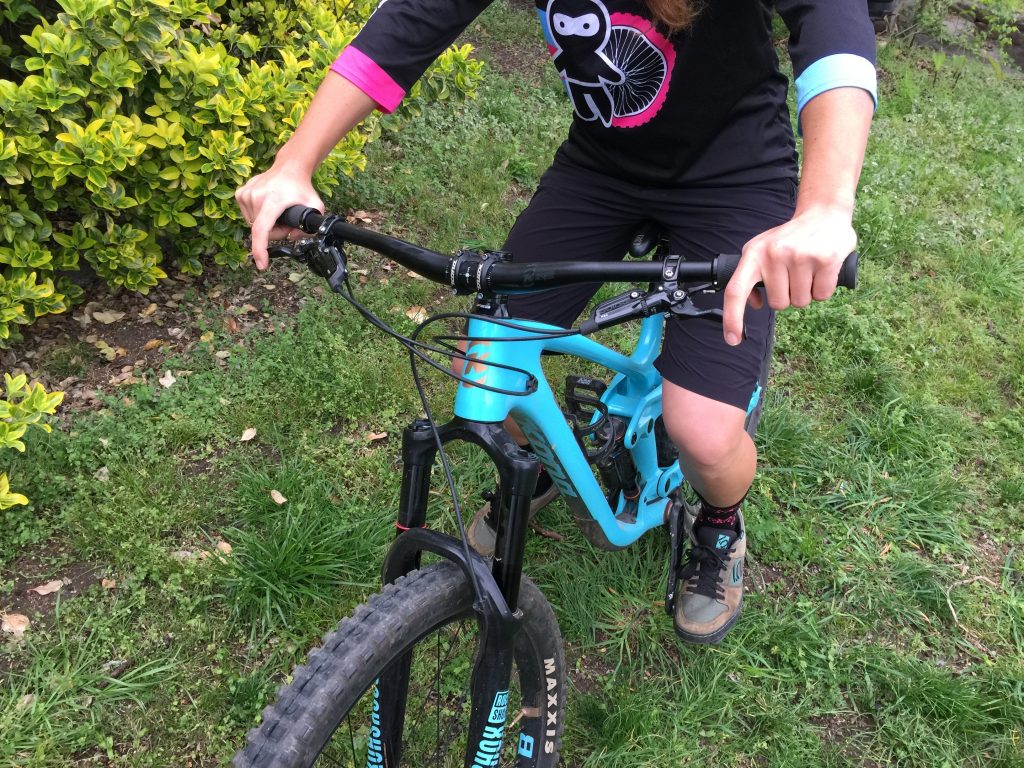
Modern mountain bikes with hydraulic disc brakes have brake levers that are specially designed to be used by one finger, your index finger, in ALL situations.  With your hands positioned correctly on the handle bars, the last joint in your index finger (distal interphalangeal) should line up perfectly with the bend at the end of your brake levers.   When checking for this alignment, make sure your hands are completely on the hand grips — if the side of your hand is hanging off the bars (grips) you’ll be putting pressure on your Ulnar nerve.  This pressure can cause numbness in your hand and arm, fatigue, discomfort and diminished control of your bike.

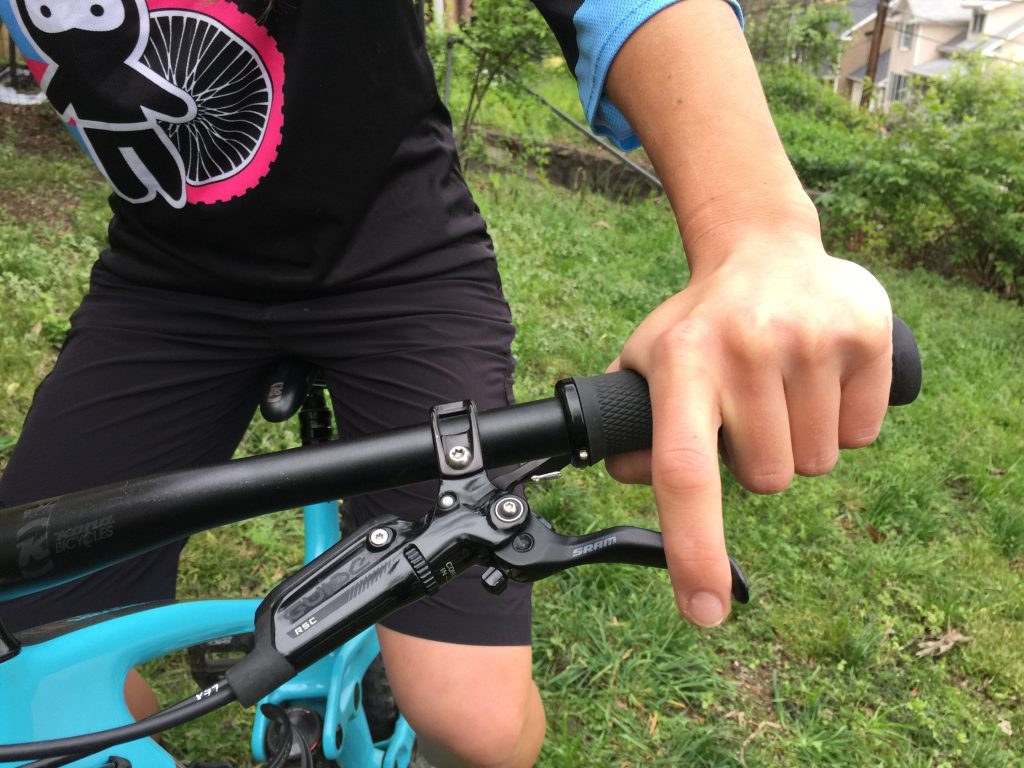
Adjusting the positioning of your brake levers so that your index finger naturally lines up with this bend in the brake lever, will give you better bike control, a better feel for what the brakes and tires are doing and greater confidence in your riding.

Let’s talk about the “why”.

With one finger braking, three fingers from each hand are sharing the job of holding the bar– even during gear shifting and using your dropper post.  Your hands are more secure and balanced on the bar.  Any less than three fingers on the bar and your ability to control the bike will diminish.   Correct lever positioning leads to reduced hand and arm tension, an overall reduction in stiffness and improved flow and easier shifting.  This secure control of the bar will allow you to push your limits, use the brakes less and keep momentum while riding.

Not convinced?  Still want to brake with your middle finger or your middle finger and index finger?   Let’s do a quick experiment to explore the science behind all of this from science made simple.

Try this…

Bend your middle finger and place the center section on a table or hard surface.  You will be able to lift your thumb, index, and little finger without moving your middle finger.  But it is impossible to lift your ring finger.

What is happening?

The tendons in your fingers are independent from one another apart from the ones in your middle and ring finger. These tendons are connected, so that when your middle finger is folded down you cannot move your ring finger.  It feels like your ring finger is stuck!

Now, let’s bring this back to the bike.  If you use your middle finger to brake, your ring finger strength is compromised because it can’t independently hold onto the bars.   For optimal braking and control, let your free bending index finger do all the braking while the rest of the hand focuses on control, shifting and operating your dropper post.

Take the leap and switch to one finger braking.  That nervous feeling of not having enough steering control at high speed will be a thing of the past.

9 Responses

    1. Hi Eli! Thanks for your question. It most cases, yes — you should use one finger (your index finger) for braking regardless of your braking system. However, I can see where (with cantilever brakes) you might find situations (steep / fast descents) where one finger isn’t enough — and unfortunately, you’re going to have to sacrifice some handling / grip control and add another finger to your brake levers. Keeping your brake pads clean and properly aligned can go a long way for maintaining the best possible braking power.

  1. Sorry, but I totally disagree with you guys about index finger braking. Using your middle finger gives you a wider grip on the bars and thus, more control, and allows you to shift with the index finger while braking if needed. That tendon thing you describe has nothing to do with this. With the middle finger on the brake lever the ring finger still has full grip power. Try this: Put you middle finger out and see if you can still grip the bar with your ring finger, yes, you can!

    1. After braking with just my middle finger for 6 years now, I read through this article thinking that there was no way it would change me. Then I did the little ‘middle finger on the table experiment’ and instantly thought: “that’s it…I am going to change my riding style tomorrow”…then I read this comment and thought: “yeah…wait, he’s right: I CAN grip my bar with my other 3 fingers just fine”
      So…thank you Mark…You restored my faith in my own goofy riding style!
      Cheers mate!

      1. First off, I just re-read this article and agree with you and Mark … to an extent. I think we got too caught up in the catchy title.

        In hindsight, this article would have been better written as “When Not to Brake with Two Fingers”. Referring to your middle finger AND your index finger [which we commonly see in riders attending our events].

        As you’ve both indicated, you still get a pretty good grip with your index, ring and pinky finger on the bars, BUT still not as strong as the grip (and control) you get from your middle, ring and pinky.

        Additionally, there’s one other factor you’re both overlooking …

        When you brake with your middle finger, your index finger is in the way of your brake lever. In order to engage your brake with your index finger on the grip, you have to set your brake levers engagement point way out in front of your handgrips.

        Most Professional Enduro/DH riders ride with their brake levers very close to the bars, often barley touching or less than 1mm off the bars when fully actuated. This give them lots of grip / control and keep the brake levers quickly accessible.

        I appreciate your feedback / comments and would love to keep the discussion going.

        1. Thanks for the response and validation! I totally agree that with modern disc brakes 2 finger braking is not needed or desired.

          I don’t know if I’d get a stronger grip when braking with my index finger, but I do know that I grip over a wider area when braking with my middle finger, which gives better control.

          That’s an interesting point about the index finger being in the way when braking with the middle finger. I’ve never actually changed the engagement point on any of my brakes and it’s not an issue. If my brake lever is getting that close to the bars, something is wrong and needs to be addressed, like a brake bleed or new pads. I have no idea about DH or Enduro racers, but normal riders do not set their brakes up with levers that close to the bars.

          I guess I’m a bit of an outlier, as most people brake with their index finger…

  2. I had on-going issues with “tennis elbow” that seemed to be related to my riding. When I switched to single finger braking using my index fingers, the elbow pain went away and has never returned.

  3. What’s the solution if you have a longer brake lever but a smaller hand? When I move the brake further away from my hand so that I can use just one finger, the shifters are too far away. And due to the way the shifters are made (with a gear display), I can’t move them inside of where the brake attaches to the handlebar.

Leave a Reply

Your email address will not be published. Required fields are marked *

keep me in the loop

NOTIFY ME!

I’d like to be notified when new events are added.

Your Privacy is Protected. We will never sell or share your information.

Fundamentals Trail Application - Women's Only

Here’s What We’ll Cover

The specific skills taught in this clinic will depend on available trail features and will vary between locations. Skills covered may include:

  • Rock / Log Step-Ups 
  • Pedal Assisted Front Wheel Lifts
  • Steep Transitions, Roll-Downs
  • Reading trail and line choice
  • Using trail features for maximum flow
  • Turning (Low Speed)
  • Navigating Trail Obstacles
  • Switchbacks – Optimal Line Choice
  • Ratcheting application – how & when 
  • Track stands
  • Braking for Speed 
  • Shifting – Timing + Technique on Technical Terrain
  • Skinnies
  • Off-Camber Trails 
  • Berms 
  • Water crossings 
  • Roots 

The Schedule*

  • 1:15-1:30pm Meet your instructor  | Arrival at course venue + equipment check
  • 1:30 – 1:45pm Fundamentals Skills | Rapid Review 
  • 1:45 – 3:45pm Coached Trail Ride | Sessioning & Skills Application
  • 3:45-4:00pm Review, questions & next steps | #Ridelikeaninja

*Clinic schedule and skills covered may vary according to location and terrain.

Fundamentals Trail Application

Here’s What We’ll Cover

The specific skills taught in this clinic will depend on available trail features and will vary between locations. Skills covered may include:

  • Rock / Log Step-Ups 
  • Pedal Assisted Front Wheel Lifts
  • Steep Transitions, Roll-Downs
  • Reading trail and line choice
  • Using trail features for maximum flow
  • Turning (Low Speed)
  • Navigating Trail Obstacles
  • Switchbacks – Optimal Line Choice
  • Ratcheting application – how & when 
  • Track stands
  • Braking for Speed 
  • Shifting – Timing + Technique on Technical Terrain
  • Skinnies
  • Off-Camber Trails 
  • Berms 
  • Water crossings 
  • Roots 

The Schedule*

  • 1:15-1:30pm Meet your instructor  | Arrival at course venue + equipment check
  • 1:30 – 1:45pm Fundamentals Skills | Rapid Review 
  • 1:45 – 3:45pm Coached Trail Ride | Sessioning & Skills Application
  • 3:45-4:00pm Review, questions & next steps | #Ridelikeaninja

*Clinic schedule and skills covered may vary according to location and terrain.

Ninja Kids clinics

Here’s What We’ll Cover

Some of the skills taught and practiced in the Kids Fundamentals Clinic may include:

  • Ninja (Ready) Position
  • The Riding Rainbow: Body Position
  • How to use your gears
  • Front + Rear Wheel Lifts
  • Safely getting on/off your bike
  • Getting over trail obstacles
  • Turning + Switchbacks
  • Reading the trail: Red Light, Yellow Light, Green Light
  • When and how to brake
  • The 4 Climbing Positions
  • Descending in control
  • How to have fun and be safe!
  • Safety check, bike care

Clinic schedule, time and skills covered may vary according to location and terrain.

2-Day CAMPS

Sample Camp Schedule*

Day 1 (Saturday)

  • 8:45-9:00 Meet your instructor  | Arrival at course venue + equipment check
  • 9:00-9:15 Let’s get started | Introductions, camp overview, bike safety check, bike set-up review
  • 9:15-9:30 Warm-up ride | Head to skills area
  • 9:30-12:15 Mornings skills session | Ready position, bike-body separation, effective braking, fluid shifting, body positioning, wheel lifts
  • 12:15-1:30 Lunch break | BYO
  • 1:30 – 4:00 Intro to jumping | Manuals, bunny hops + how to safely jumping (and land) your mountain bike

Day 2 (Sunday)

  • 8:45-9:00 Meet at trailhead | Gear up for day 2!
  • 9:00-9:15 Review | Brief review of Day 1 skills
  • 9:15-12:00 Morning skills session | High-speed cornering, switchbacks, drops, rock dodge, technical climbing & descending
  • 12:00-1:00  Lunch break | BYO
  • 1:00-3:45 Trail ride + skills application | Put those skills to work!
  • 3:45-4:00 Review, questions & next steps | #Ridelikeaninja


*Clinic schedule and skills covered may vary according to location and terrain.

After camp, you will see an immediate improvement in your riding and a boost in confidence on technical trails. You will be able to tackle rougher terrain and corners with greater control and flow through singletrack, switchbacks, and berms with more speed and efficiency.

Jumping Mini-Clinics

Here’s What We’ll Cover

Some of the skills taught and practiced in the Jumping Mini-Clinic may include:

  • Wheel lift Review
  • Bunny hops
  • Jumping body positioning
  • Anatomy of a jump
  • Speed vs. compression | How and when?
  • Landing with precision
  • Let’s get jumping! | Jump progressions

The Schedule*

Please note, clinics may vary according to location and terrain.

  • 1:30-1:45  Meet your instructor | Arrival at course venue + equipment check
  • 1:45-2:00 Let’s get started | Introductions
  • 2:00 – 2:30  Intro to jumping | Wheel lifts, manual, bunny hop
  • 2:30 – 3:00 Reading the jump | Anatomy of a jump, speed vs compression, landings
  • 3:00 – 3:45 Let’s jump! | Jumping progressions on table tops
  • 3:45-4:00 Review and next steps | #ridelikeaninja


*Clinic schedule and skills covered may vary according to location and terrain.

Intermediate / advanced clincs

Here’s What We’ll Cover

Some of the skills taught and practiced in the Intermediate/Advanced clinic may include:

  • Negotiating trail obstacles (i.e. rock gardens, roots, logs)
  • Steep transitions
  • Drops
  • High speed cornering
  • Technical climbing
  • Technical descending
  • Advanced braking
  • Reading the trail
  • Introduction to energy management & flow
  • Pumping for speed & air
  • Technical Switchbacks (where available)
  • Ratcheting & Trackstands
  • Visualization

The Schedule*

  • 8:45-9:00 Meet your instructor  | Arrival at course venue + equipment check
  • 9:00-9:15 Let’s get started | Introductions
  • 9:15-9:45 Accelerated review of Fundamentals | With intermediate+advanced progressions
  • 9:45-12:00 Morning skills session | High-speed cornering, Switchbacks, drops, rock dodge, technical climbing & descending
  • 12:00-1:00  Lunch break | BYO
  • 1:00-3:45 Trail ride + skills application | Put those skills to work!
  • 3:45-4:00 Review, questions & next steps | #Ridelikeaninja

*Clinic schedule and skills covered may vary according to location and terrain.

WOMEN'S ONLY Fundamentals Combo

Here’s What We’ll Cover

The specific skills taught in this clinic will depend on available trail features and will vary between locations. Skills covered may include:

  • The Ready Position
  • Bike/Body Separation
  • Intro to Steep Transitions
  • Effective Braking
  • Braking for speed
  • Wheels lifts – Step-Ups
  • Shifting, Timing & Cadence
  • Negotiating trail obstacles
  • Turning / Switchbacks
  • Climbing + Descending
  • Dismounting
  • Mind skills
  • Steep Transitions, Roll-Downs
  • Reading trail and line choice
  • Using trail features for flow
  • Turning (Low Speed)
  • Ratcheting – how & when 
  • Track stands
  • Skinnies
  • Off-Camber Trails
  • Berms
  • Water crossings
  • Roots

The Schedule*

  • 8:45-9:00  Meet your instructor  | Arrival at course venue + equipment check
  • 9:00-9:15 Let’s get started | Introductions
  • 9:15am – 11:15 Skills & drills | Learn, learn, learn
  • 11:15am – 12:15 Take it to the trail | Apply what you’ve learned
  • 12:15 – 1:30pm Lunch Break | Rest & Refuel
  • 1:30 – 1:45pm Fundamentals Skills | Rapid Review 
  • 1:45 – 3:45pm Coached Trail Ride | Sessioning & Skills Application
  • 3:45-4:00pm Review, questions & next steps | #Ridelikeaninja

*Clinic schedule and skills covered may vary according to location and terrain.

Co-ed Fundamentals Combo

Here’s What We’ll Cover

The specific skills taught in this clinic will depend on available trail features and will vary between locations. Skills covered may include:

  • The Ready Position
  • Bike/Body Separation
  • Intro to Steep Transitions
  • Effective Braking
  • Braking for speed
  • Wheels lifts – Step-Ups
  • Shifting, Timing & Cadence
  • Negotiating trail obstacles
  • Turning / Switchbacks
  • Climbing + Descending
  • Dismounting
  • Mind skills
  • Steep Transitions, Roll-Downs
  • Reading trail and line choice
  • Using trail features for flow
  • Turning (Low Speed)
  • Ratcheting – how & when 
  • Track stands
  • Skinnies
  • Off-Camber Trails
  • Berms
  • Water crossings
  • Roots

The Schedule*

  • 8:45-9:00  Meet your instructor  | Arrival at course venue + equipment check
  • 9:00-9:15 Let’s get started | Introductions
  • 9:15am – 11:15 Skills & drills | Learn, learn, learn
  • 11:15am – 12:15 Take it to the trail | Apply what you’ve learned
  • 12:15 – 1:30pm Lunch Break | Rest & Refuel
  • 1:30 – 1:45pm Fundamentals Skills | Rapid Review 
  • 1:45 – 3:45pm Coached Trail Ride | Sessioning & Skills Application
  • 3:45-4:00pm Review, questions & next steps | #Ridelikeaninja

*Clinic schedule and skills covered may vary according to location and terrain.

Ninja MTB Logo

Women's Only Fundamentals Clinics

Level 1 - Here’s What We’ll Cover

Some of the skills taught and practiced in the Women’s Only Fundamentals Clinic may include:

  • The Ready Position
  • Bike/Body separation
  • Intro to Steep Transitions
  • Effective braking
  • Wheels lifts
  • Shifting + cadence
  • Negotiating trail obstacles
  • Turning / Switchbacks
  • Climbing + Descending
  • Dismounting
  • Mind skills

The Schedule*

  • 8:45-9:00  Meet your instructor  | Arrival at course venue + equipment check
  • 9:00-9:15 Let’s get started | Introductions
  • 9:15am – 11:15 Skills & drills | Learn, learn, learn
  • 11:15am – 12:00 Take it to the trail | Apply what you’ve learned
  • 12:00-12:15 Review and next steps | #ridelikeaninja
 

*Clinic schedule and skills covered may vary according to location and terrain.

Ninja MTB Logo

Co-ed Fundamentals Clinics

Level 1 - Here’s What We’ll Cover

Some of the skills taught and practiced in the Fundamentals Clinic may include:

  • The Ready Position
  • Bike/Body separation
  • Intro to Steep Transitions
  • Effective braking
  • Wheels lifts
  • Shifting + cadence
  • Negotiating trail obstacles
  • Turning / Switchbacks
  • Climbing + Descending
  • Dismounting
  • Mind skills

The Schedule*

  • 8:45-9:00  Meet your instructor  | Arrival at course venue + equipment check
  • 9:00-9:15 Let’s get started | Introductions
  • 9:15am – 11:15 Skills & drills | Learn, learn, learn
  • 11:15am – 12:00 Take it to the trail | Apply what you’ve learned
  • 12:00-12:15 Review and next steps | #ridelikeaninja
 

*Clinic schedule and skills covered may vary according to location and terrain.

LEAVING SO SOON?

60% Off

IF YOU SIGN UP FOR A MTB SKILLS CLINIC TODAY!

Enter your email below to get your limited time coupon code (valid for 48 hours).

Valid on all Skills Camps and Clinics. Your Privacy is Protected.

Awesome sauce!

60% Off

USE THIS CODE TO SIGN UP TODAY!

CHECKOUT4XY2

*Limited time offer. Valid for 48 hours on any upcoming MTB skills clinic or camp.